Here is a nice blog by Arun Kumar that explains a hack to remove a required field from CRM without changing its property.
Hope it helps.
Here is a nice blog by Arun Kumar that explains a hack to remove a required field from CRM without changing its property.
Hope it helps.
Today I faced an in an existing plugin which was working earlier. During investigation, I found that this is caused by the “HttpUtility.UrlEncode(clientSecret)” as shown in below code snippet image
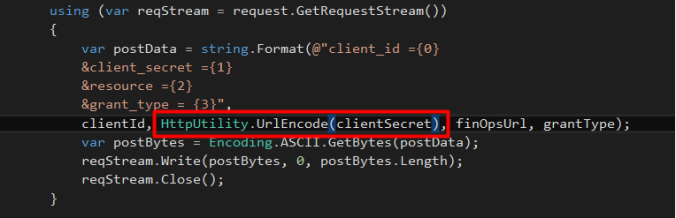
I found 2 ways to fix this issue
Thanks-
In my current Dynamics 365 implementation, we are back in the On-Premise world, after many years.
We thought of using the Plugin-Trace logs but was surprised to see that the Plug-Trace logs were not getting generated.
After doing the search realized that it only works for the plugin registered in the Sandbox mode.
https://docs.microsoft.com/pt-pt/powerapps/developer/common-data-service/logging-tracing
 https://community.dynamics.com/crm/f/117/t/189346
So for time being, we registered in it Sandbox to get the trace.

Found the below article that has the workaround (unsupported)
http://blog.intocrm.net/how-to-write-plug-in-trace-logs-outside-the-sand-box/
Meanwhile, we can also Vote for the Idea
https://experience.dynamics.com/ideas/idea/?ideaid=abc7aceb-a8d9-e611-80c1-00155d460d59
Hope this helps..
In one of my recent project, there was a requirement to disable/remove export button from report viewer (Only for certain set of users).
To achieve this, we had to remove below two permissions from all roles assigned to those users. You can remove one or both the permission to match your need.
 download option from report viewer)
 print option from report viewer)
Before removing permissions

After removing permissions

Thanks
References:
In this blog, I will describe how to debug the XrmToolBox plugin project which we created in Part 1. If you have not read my first blog I recommend you read it first.
This is my second blog in the series of 4 blogs, below are the links to other blogs
Prerequisites:
Step 1: Add post-build command to your VS project to create a Plugin folder and copy your plugin assemblies to this folder.
if $(ConfigurationName) == Debug (
IF NOT EXIST Plugins mkdir Plugins
move /Y SampleXrmToolBoxPlugin.dll Plugins
move /Y SampleXrmToolBoxPlugin.pdb Plugins
)

Step 2: Configure XrmtoolBox.exe to start on debugging by setting the XrmToolBox.exe path in “Start external program”. This exe can be found at “<<your plugin project location>>\bin\Debug\XrmToolBox.exe”. If you don’t see this exe in debug folder, just rebuild your plugin.
/overridepath:. – it will tell XrmToolBox.exe to look for the plugin in the debug folder of your project
/connection:”<<crm connection name>>” – the name of the CRM connection you have saved in XrmToolBox. It saves debugging time by automatically connecting to CRM instance.
/plugin:”<<plugin name>>” – the Name of your plugin as you have specified in “MyPlugin.cs” file

Step 3: Add XrmToolBox.exe.config file
You need to add this file to your project and set its property “Copy to Output Directory” to “Copy always”. This file can be found at

Step 4: copy dependencies to XrmToolBox.exe.config
Now you are all set to debug your project.
Hope it helps .
Reference: https://github.com/MscrmTools/XrmToolBox/wiki/Debug-your-plugins-during-development
Recently I created my first XrmToolBox plugin User Security Manager and successfully released this to the plugin store. I followed XrmToolBox for developers and the other resources available on the internet but creating a plugin was not so smooth for me, so I thought of writing my experiences and detailed step by step guide.
I will detail the entire process in 4 different blogs this is my first blog in this series.
Prerequisites:
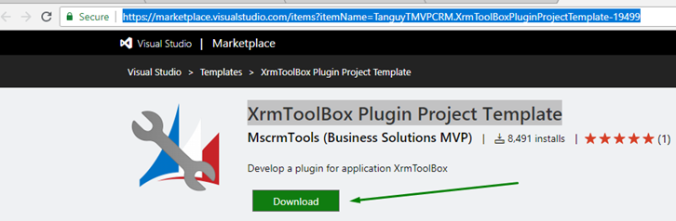
Step 1: Download and install XrmToolBox Plugin Project Template: download VS 2017 project template and install on your dev machine.
Step 2: Open VS 2017 and go to File -> New -> Project…, it will open a new project window.


Step 3:
Update Plugin Metadata open file “MyPlugin.cs” and update the following metadata details

Step 4: Build your plugin logic At this point you are all set to start building your logic into the plugin. You can create UI and add code logic but still, you cannot run/debug it. In my next blog I will talk about debugging, but before we go there let’s elaborate on the various components of this project, do’s and don’ts. (below is how default project structure will look like)


If you inherit “MultipleConnectionPluginControlBase” then you need to implement “ConnectionDetailsUpdate”


Hope It helps. In the next blog, I will explain how to debug your plugin in visual studio.
I am excited to share that latest version of our XrmToolBox plugin “User Security Manager” is ready and available to download in XrmToolBox plugin store.

We have implemented the following enhancement in the latest version
For more details of tool’s latest feature and user guide, please click here for complete user guide of this tool click here
We love to hear from you, please update/install it use it and share your feedback

For past few weeks I have been thinking to add my bit to XrmToolBox, the most loved tool by me and the entire Dynamics 365 Community.
Here is my first plugin “User Security Manager”. Which I developed along with Nishant Rana.

This tool will help in efficiently managing User’s security in Microsoft Dynamics 365 Customer Engagement. Below is the list of features it has
For more details of tool’s feature and user guide, please see this blog by Nishant Rana.
We love to hear from you please install it, use it, and share your feedback .

Issue: I was getting this error “There is no active transaction. This error is usually caused by custom plug-ins that ignore errors from service calls and continue processing” when I was trying to resolve a case in dynamics CRM. Below is the detail error message.
<s:Envelope xmlns:s=”http://schemas.xmlsoap.org/soap/envelope/”>
<s:Body>
<s:Fault>
<faultcode>s:Client</faultcode>
<faultstring xml:lang=”en-US”>There is no active transaction. This error is usually caused by custom plug-ins that ignore errors from service calls and continue processing.</faultstring>
<detail>
<OrganizationServiceFault xmlns=”http://schemas.microsoft.com/xrm/2011/Contracts” xmlns:i=”http://www.w3.org/2001/XMLSchema-instance”>
<ActivityId>47a272d8-8312-43c0-a360-ed042eeced84</ActivityId>
<ErrorCode>-2147220911</ErrorCode>
<ErrorDetails xmlns:a=”http://schemas.datacontract.org/2004/07/System.Collections.Generic”/>
<Message>There is no active transaction. This error is usually caused by custom plug-ins that ignore errors from service calls and continue processing.</Message>
<Timestamp>2018-07-09T08:36:55.4146969Z</Timestamp>
<ExceptionRetriable>false</ExceptionRetriable>
<ExceptionSource i:nil=”true”/>
<InnerFault>
<ActivityId>47a272d8-8312-43c0-a360-ed042eeced84</ActivityId>
<ErrorCode>-2147220911</ErrorCode>
<ErrorDetails xmlns:a=”http://schemas.datacontract.org/2004/07/System.Collections.Generic”/>
<Message>There is no active transaction. This error is usually caused by custom plug-ins that ignore errors from service calls and continue processing.</Message>
<Timestamp>2018-07-09T08:36:55.4146969Z</Timestamp>
<ExceptionRetriable>false</ExceptionRetriable>
<ExceptionSource i:nil=”true”/>
<InnerFault i:nil=”true”/>
<OriginalException i:nil=”true”/>
<TraceText i:nil=”true”/>
</InnerFault>
<OriginalException i:nil=”true”/>
<TraceText i:nil=”true”/>
</OrganizationServiceFault>
</detail>
</s:Fault>
</s:Body>
</s:Envelope>
Root Cause: as evident from the error message there was some issue with some custom plugins on case close action. I was not having any custom plugin (or workflow) on this action but there was one from Microsoft (ActivityFeeds.Plugins.CaseClose). After disabling both steps of this plugin case started to resolve without any error.

Seems like there is some issue with the activityfeed plugin. As this plugin form MS worked fine till now so I started analysing why it is failing in my case. And finally, we came to now that it was happening because of empty customer name.
Fix: If customer (account/contact) name/full name is blank “(No name)” you will get this error. To resolve this issue you need to provide firstname/lastname/name field value on customer record.

Recently we tried copying our DEV to one of the TEST instances. The idea was we were upgrading the click dimensions solution in our DEV so we wanted to make sure everything works fine after the upgrade and in case it didn’t we could then again copy it back from the TEST.
We had faced back and restore issues (instance failed) in the past so decided to go the Copy instance way this time.
However, we got the Instance Failed error on the TEST instance to which we were copying DEV to.
Interestingly the Edit, Reset, Delete etc option were still available and we could open the TEST instance (the original, as the copy of DEV had failed) without any issues.

Then we thought of giving a try again and started copy from DEV to TEST again. This time again it failed. And with no option of Edit, Reset, delete…
View original post 203 more words
